RC Aircraft
Nano Gremlin FPV
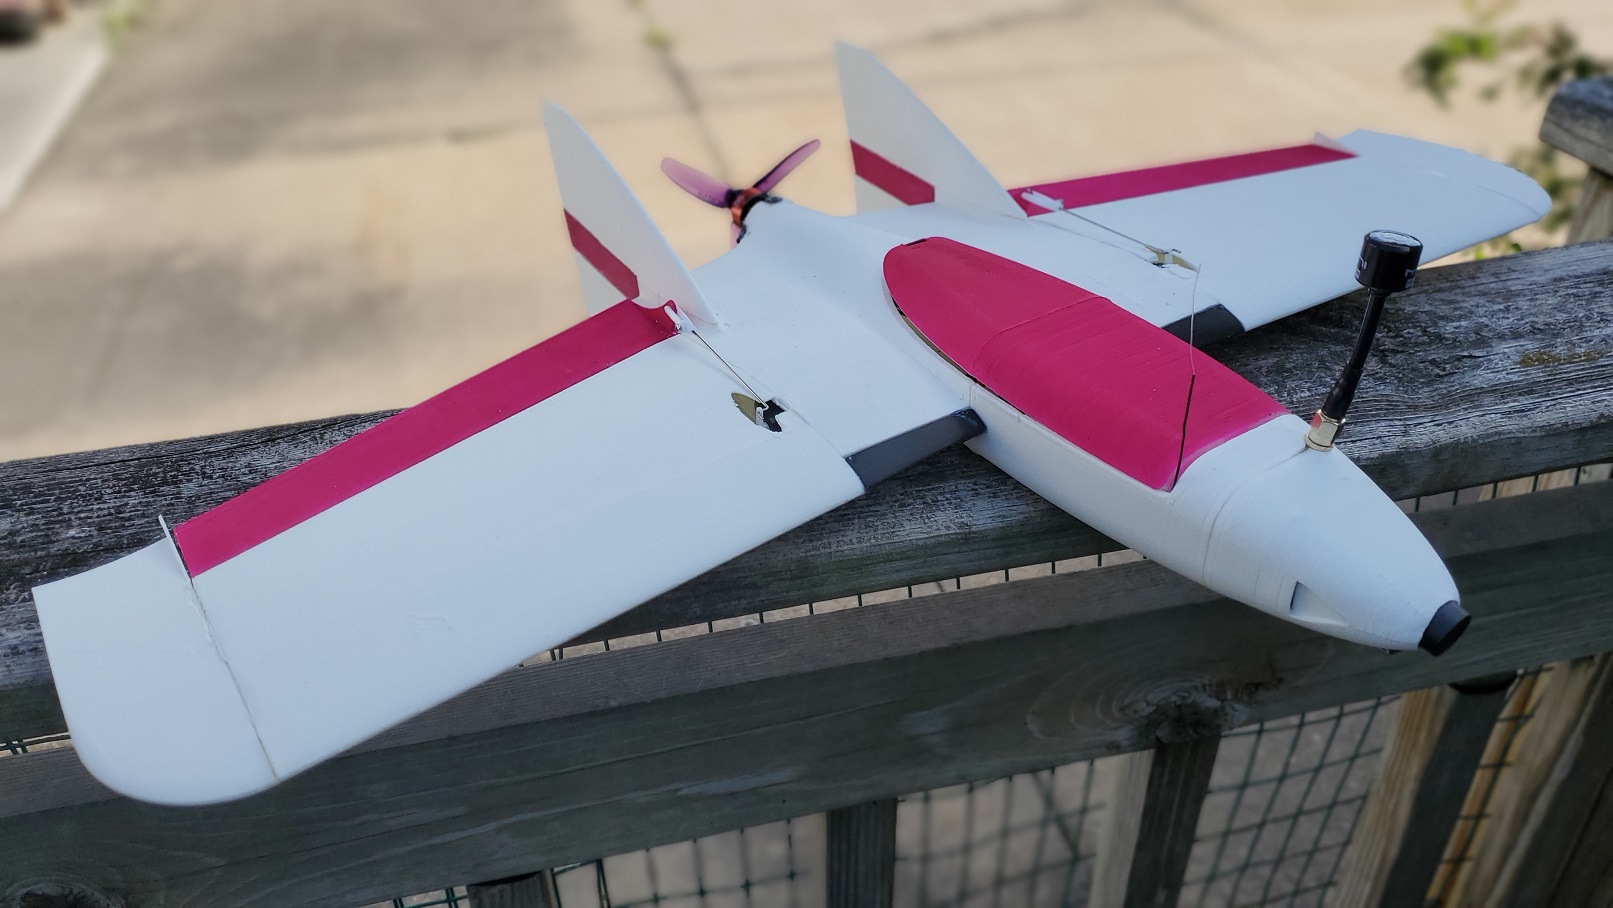
After building the Pico Goblin, I wanted to try a larger model that could stay in the air longer. Of course, this design is based off the Strix Nano Goblin. However, I can't justify spending 80 plus dollars on a piece of foam and a few other common parts. I don't understand how people keep buying these for such crazy prices. It's the same foam planes you can get at Walmart or wherever in the toy section for kids, just in a slightly different form, so it's obvious there's no reason for them to be that expensive - other than pure greed.
Looking for a cheaper alternaive I found the Nano Gremlin. After watching the videos I was sold. I downloaded the plans for the amazingly low price of one dollar. I had just bought a new 3D printer to replace my old one, as I wanted one that could print LW-PLA, which my previous one couldn't. The first plane I printed, the Mini Delta, printed out fine (after a bit of figuring out the right settings for LW-PLA that is), but this one did not. It was extremely thin in some areas, had a lot of gaps, and was just just not going to work. I tried to open the STL file in Blender to possibly fix it myself, however, it was just a nightmare, it was created from planes instead of one solid shape, so was going to be impossible to change or fix in any way. I saw in the comments that others also had trouble printing the plane, so I figured it was just not going to work, and oh well, it only cost a dollar, and maybe that's why it was so cheap, because it wasn't that great.
Fast-forward to about a year later, and I decided to look at it again, I don't know why exactly, maybe because others did have success in printing it, and maybe I had missed something. Or maybe it's that stubborn part of my brain that refused to let something beat me. So I started digging through the almost 300 pages of the forum post for an answer, and found what might have possibly been the issue. Apparently, when this design was made, it was made when most slicing software was using something called the Arachne engine. Since this was over three years ago, slicing software has adapted a newer engine, which is supposed to be better (hence why it was adopted by most slicers). However, it seems this newer engine has problems with some models, so the answer may be to use a slicer with the Arachne or "classic" engine instead. For my Creality printer, I used Creality Print v5, which allows you to change the engine under Quality -> Wall Generator. I made the change, tried to print out the fuselage piece again, and to my surprise it worked.
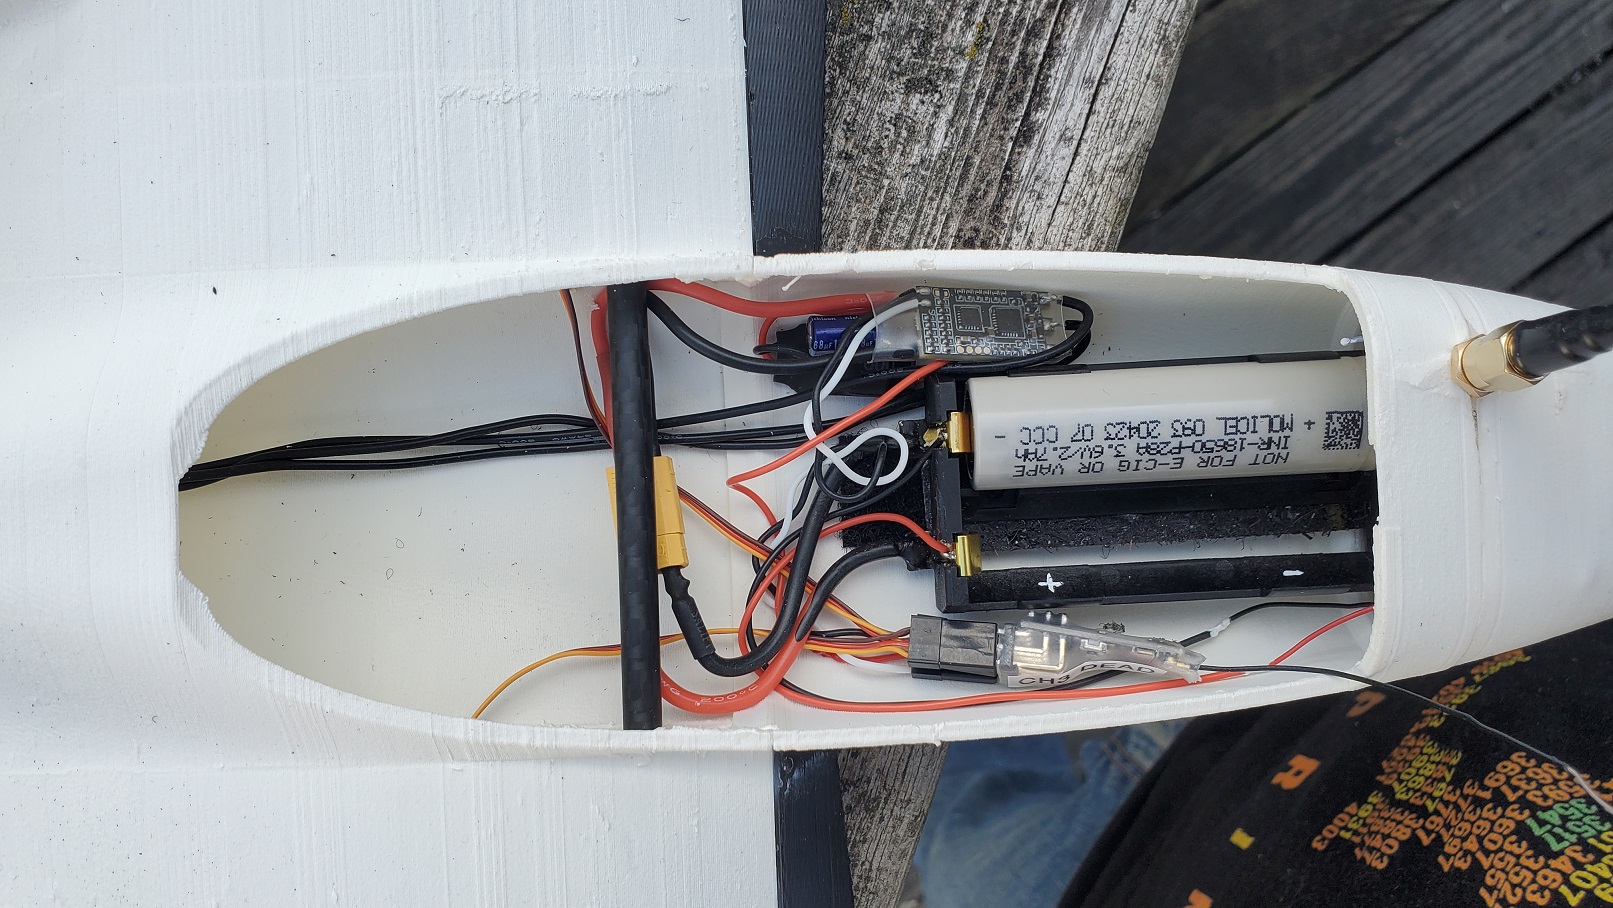
From there I just printed out the rest of the parts and put it together according to the build video. I decided to use two 18650 cells for the battery, and instead of making a 2s battery from them, I just bought some two-battery holders. I then glued velcro to the bottom and to the cockpit so I could move it around to balance the plane.
Maiden Flight(s)
As always, the maiden is a bit nerve-wracking, especially in the case where you paint the model first like I did. I hate the idea of making something that looks to nice that has a good chance of being destroyed in a couple of seconds.
I chose a favorite area close by that has some very tall grass, which I figured would help mitigate some damage if it crashed.
Maiden #1
I launched the plane near full throttle, and it dove to the left (away from the taller grass of course) and crashed.
- Assessment: not enough power; probably tail heavy; possible torque roll causing it to roll left.
- Remedy: throw the plane harder on launch; make sure not to roll it left on launch, possibly giving it some slight roll to the right; add nose weight.
- Damage: Front fuselage broken off, motor detatched, esc wire detatched.
- Fixes: Glued fuselage back, mounted motor internally instead of externally as it needed more nose weight.
Maiden #2 and #3
Launched the plane near full throttle, putting more power into the throw, making sure to keep it level and somewhat to the right. I also positioned right over some all brush to help minimize any impacts. Crashed both times, and was wondering how this was ever able to use THREE 18650 batteries, I was having a tough time getting airborne with just two. Not only that, I was using active foaming LW-PLA, not pre-foamed like the author was using, so my model should have been even lighter.
- Assessment: Not enough power.
- Remedy: Add a larger propeller.
- Damage: Slight cracks to fuselage.
- Fixes: Glued small cracks; added a larger propeller.
Maiden #4
Found that I was actually using a 2680kv motor instead of a 4200kv as was stated in the build. This would explain the lack of power, so to compensate, and since it was a lower kv, I used a bigger 5 inch prop with a more aggressive angle (Gemfan Hurricane 51499). Launched the plane near full throttle, putting a bit of power into the throw, making sure to keep it level and somewhat to the right. To my surprise, the nut and propeller came off immediately. This was actually a somewhat good thing, seeing as it happened immediately, and not mid-flight. I was also confused, seeing that I was using a lock-nut, and I tightened it quite well. You do the same with quads, so you don't have to worry about CW/CCW nuts, so I'm not sure why there would be a difference here. It may have had something to do with the canopy coming off immediately and hitting the propeller.
- Assessment: Not enough power.
- Remedy: Add a larger propeller.
- Damage: Lost prop and nut. Reprinted canopy cover.
- Fixes: Reversed the motor and propeller so that it turned the opposite direction of tightening of the nut (motor and propeller CCW, nut CW).
Maiden #5
 Apparently the lower kv motor was indeed the issue, and the larger propeller was the cure. I was in a really small area so didn't want to chance hitting any of the many nearby trees, so landed it early. Was able to land in tall grass with no damage.
FPV Flights
RTFM
For the initial flights I used a 1300mah 3S battery, figured I'd implement the 3-cell 18650 after I got INAV and such figured out. This was my first time utilizing a flight controller in a fixed wing, for which I chose INAV - also a first, as I've been using BetaFlight in the flight controllers on my other quads. After installing and configuring, which took a good day of research, I felt I checked and double-checked everything and was ready to try it out.
Unfortunately, I ended up crashing more times than I like to admit, and I thought it was because I was now using a bigger propeller which was causing major torque roll to the right. Launch after launch, I'd put it near full throttle and throw it, and it would roll right and crash. What was bothering me though was the fact that I had it flying without the flight controller, but I chalked it up to the rates being rather low, or maybe my launch throws were just not very level - which to be honest, I did feel like this might be the issue as you have to hold the model more toward the front than I feel is comfortable when throwing it in the air.
After implementing a mix to mitigate torque roll, I scoured my settings and looked online for anyone with similar issues to see if I missed something. After looking though a few posts, it occured to me I hadn't actually tested the flight stabilization to make sure it was moving the elevons correctly, since someone mentioned the stabilization won't work correctly if the channels aren't set up correctly on the radio. I decided to check the stability controls when moving the plane, and sure enough, when I rolled in on direction, both elevons moved upwards, and when pitching, only one did.
When I first set up the plane, I had flown it manually without the flight controller. When switching it over, I found out that INAV does the aileron/elevator mixing, so you have to remove that from the radio, just having only aileron for one channel, and only elevator for the other. I just removed the extra two mix entries, and set up INAV. The plane moved exactly the way it was supposed to on the status screen, and the servos moved in the correct directions after setting up the receiver, so I figured everything was operating correctly. However, it turns out it's required to have the channels 1-4 in the radio mixer set to AETR respectively, but when I removed the extra mixes, I inadverantly switched the channels, having elevator for channel 1 and aileron for channel 2.
INav Magic
There are quite a few cool things you can do when you have a flight controller with INav and a GPS. You can set up auto-launch so that when you throw your plane in the air, it automatically ramps up to speed and climbs while you put on your FPV goggles. You can set a button on your transmitter to have the plane loiter in place. Or you can have a button to have it return to home, where it will hover around where you took off - or you can set it to land automatically if you like. As well you can set a failsafe mode to do these things like return home and/or land automatically if the FC loses radio signal. You can set different OSD profiles and set them on switches on your controller so you can change them in flight, or turn it off completely. You could even set nav points and have the plane fly completely autonomously, from GPS waypoint to GPS waypoint. There's so many settings to play around with, it's really amazing what the community can come up with. If a corporation had their hands on this, it would lock it behind paywalls, allowing you to only have access to a few features and only accessing more with how much you pay, and probably via a subscription. Ugh, I get nauseous just thinking about it.
Be Aggressive, B-E Aggressive
On my third FPV flight, I didn't realize until way late that I had no motor power. I saw that the throttle was showing higher, but the speed was down to near stall speed. I had figured I lost my propeller, and was able to make an emergency landing not too far from me. However, the propeller was fine, but one of the motor wires had come unsoldered. This meant the wires must have been getting ridiculously hot. Sure enough, when looking back at the video, I can see I'm using over 30 amps on takeoff, and then I was pushing to go really high right away because I wanted a good view of the river. However this proved to be way too much. I also figured I was using much too aggressive of a prop pitch, so traded it out for one of the same size but with a smaller pitch as well as the blades being much less wide. Luckily I didn't fry anything else. On my fourth flight, it did get airborne just fine, but I now make sure to keep an eye on how much amperage I'm using so I don't overheat anything.
Okay, A Little Too Aggressive
On my fourth FPV flight, same thing happened, except when it landed, not only did one of the wires come unsoldereed, but the entire motor came off, as it got so hot that the screws melted through the ABS motor mount. Obviously, I was doing something wrong. After looking online, others stated that this kind of thing can occur if the motor is hindered in any way, even slightly. This would make sense seeing as I did the internal mount, and it was a pretty close tolerance. Sure it looked like it wasn't touching, but as the propeller is vibrating and pushing against the mount, that could very well possibly change, causing the motor to rub against the fuselage. So, I decided to mount it externally instead, that way there was no chance of this happening. After doing that and then another test in my hand, it was still using too many amps. I think the rubbing against the fuselage was why I figured I had to use a bigger prop, so I went back to the original four inch one that it called for.
The only other issue was now that the motor was farther back, it was now a bit tail heavy, and the battery was as far forward as it could go while keeping the canopy on. To mitigate this, I decided to mount the Hawkeye Thumb camera on the front, giving it more nose weight and allowing me to record in HD. Of course, it's a bit big and not exactly aerodynamic, so I was really putting a lot of faith into the problem being the internally mounted motor.
For the next flight, I decided to hurry up and run out before the sun went down, since the air was calm and the sun started to come out a bit from the mostly cloudy day. I was also using two new antennas on my goggles, so this is like three things now changed. I've only been doing this for a little over a year but I know not to change more than one thing since the more things changed, the more chances it's going to crash (not to mention it's easier to narrow down why it crashed as well). I knew I was pushing my luck but decided to go for broke.
You can only imagine my despair when launching the bird and it went pretty much straight up. I've also figured out in the little time I've been doing this, that when that happens, it's BAD. It's probably very tail-heavy, and it's just going to keep recovering/stalling until it crashes. I figured it didn't have enough power to keep it aloft, and that it was just going to nose into the ground, and I was over cement, and on top of all that the camera was installed right on the nose with no kind of case or cushion or what have you. I was very suprised, however, when I was able to actually pull up and out and not crash. I don't know what happened, maybe the battery shifted back from me throwing too hard, but then righted itself a bit (it's held with some rubber bands at the moment), as well as the flight controller possibly helping to correct the situation.
Turns out the internal mounted motor and larger propeller were indeed the problems, the max amps I hit were around 20 on takeoff, unlike the 30 previously. And around half throttle, I was around 4 or 5 amps, where before I was around 11 or 12. Apparently there was plenty of power, since this thing took off vertically like a rocket ship with even with the new drag-inducing camera glued to its nose and was able to level out and keep flying just fine.
A note on the videos: some of these videos are recorded from the FPV goggles. As such, the footage is analog, so if you have any epilepsy or seizure issues when seeing flashing images, do not watch the videos. The analog signal causes flashes and color changes constantly. Probably doesn't need to be stated, but if you get motion sick easily, do not watch these.
Maiden FPV Flight
- Third FPV Flight
- Fourth FPV Flight
- HD Camera Flight
Plans
Parts List
- SpeedyBee F405 Fixed Wing Mini flight controller
- JHEMCU RuiBet 3016W 1.6W Video Transmitter
- Cadex Ratel 2 v2 FPV Camera
- 5.8G FPV Antenna
- Recommended: 1507 4200kv Brushless Motor
- Actually used: 1507 2680kv Brushless Motor
- 18650 Battery x3 or 1500 mah Lipo
- ESC 30 amp li>ELRS 2.4GHz Nano Receiver
- 2g Metal Gear Servo x2
- 4043 4 Inch 3-Blade Propeller