CentiPIed: Centipede Arcade Restoration and Raspberry Pi Conversion
Background and Plans
If you're reading this, you're either part of the .00001% of the population that owns a Centipede arcade cabinet, or you enjoy repairing or tinkering with electronics/arcade equipment. I fall into both categories. I had procured this machine in the 90's when arcades were quickly becoming a thing of the past, and these remenents of the old world were just hanging around the dark corners of your local strip mall or banquet hall. After the income on these things started to dwindle to under five dollars a day, usually they figured it was using up more space and electricity as well as the time spent collecting the money from these dinosaurs then was worth the trouble. So they offered them up to the public to buy for dirt cheap. I was absolutely shocked when they said it was $200, and they would deliver it as well. I had no idea they were in such a rush to get rid of these things. Had I the space and money back then (was still under the roof of mom and dad at the time) I would have probably gotten something else, like a cocktail table, which I still long for.
Fast forward through the years - the machine started to collect dust in the basement and was never used; I had since built a MAME cabinet which plays a multitude of games, including Centipede of course, so it fell by the wayside so to speak. However, the thing I liked most about the game aside from being one of the first games I can remember playing as a kid, is the amazing artwork on it. Not many other cabinets of the time compare to the cool viscious green centipede on the side with laserbeam explosions. So, after years of sitting, one day I fired it up and say the screen filled with odd artifacts. Some chips were most likely failing on the board. They are known to do this over the years from what's known as bit rot or data rot.
One of the ways to fix it is to just go on eBay and buy a replacement board. They usually cost somewhere around $100. The problem is, they are just as prone to failure as the board you already have considering their age. Another option is to do some signal tracing and diagnostics, but doing so requires some equipment made for these boards that is somewhere to the tune of $1000 or so now. Only if you were in the business of repairing arcade boards to make money would you buy one of those, so not an option for just a single owner such as myself.
An alternative option, which I was contemplating through the years, was to use an old PC and just emulate the game. I had bought some old ATI boards years back in anticipation for such a thing. Certain boards were easier to coerce into outputing the 15khz signal needed to run the old monitors instead of a PC monitor. However, the information was very scarce as far as how to do this, and over the years, became even moreso. It was one of those things I had kicked around in my head but just never got around to diving into, as I knew it would be quite a lot of work, and without a very clear path, making it that much more time intensive. The upshot of course was that it was something that would be easily fixed/upgraded in the future, as well as the fact I could play other trackball games as well, like Millipede.
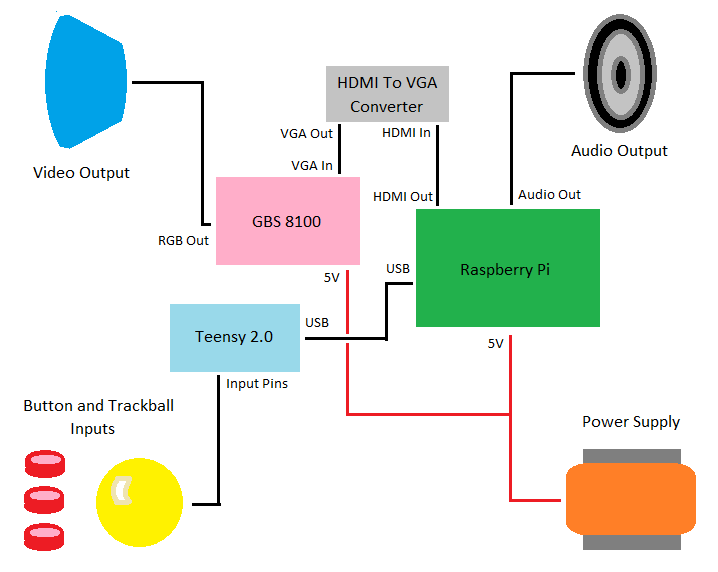
Enter the Raspberry Pi - an extremely small board that can run Linux, do emulation, and output video to HDMI and RCA. I was hoping that others had done some work trying to get these to work with the old arcade monitors using display ports or GPIO pins on the R-Pi with special drivers or whatnot. However, it seems such a thing isn't possible (currently). One day though, I came across an article describing how an arcade was doing exactly what I wanted. They described how to use the HDMI output to an active HDMI to VGA converter and then to a VGA to RGB converter. Perfect!
With a better plan of attack, I now had a better idea and more motivation to update my cabinet. However I was still uncertain on a few things, mostly the inputs - the trackball especially. After overcoming all the obstacles, I was finally able to see my dream become a reality. Hopefully this information will help others looking to do something similar.
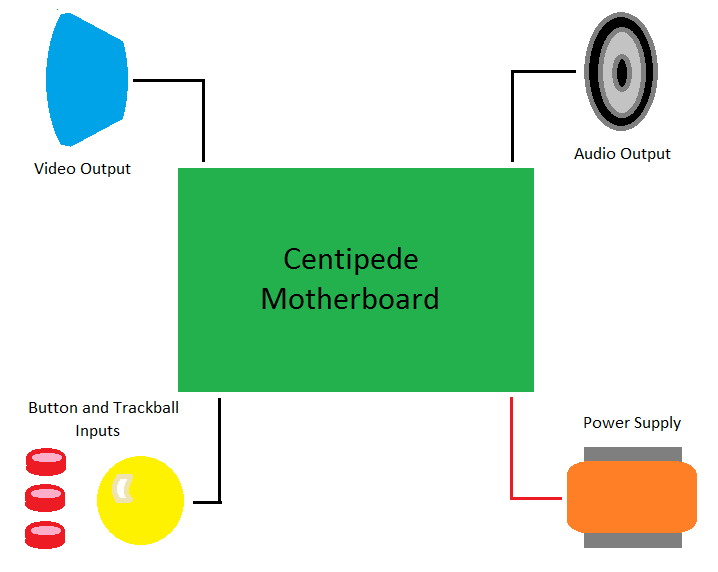
Here is a basic plan of the items replacing the original motherboard and their connections.


Before any conversion was to be done, some restoration was in order. The power capacitor and the control panel neeeded to be replaced.
Big Blue