RC Aircraft
LightWing
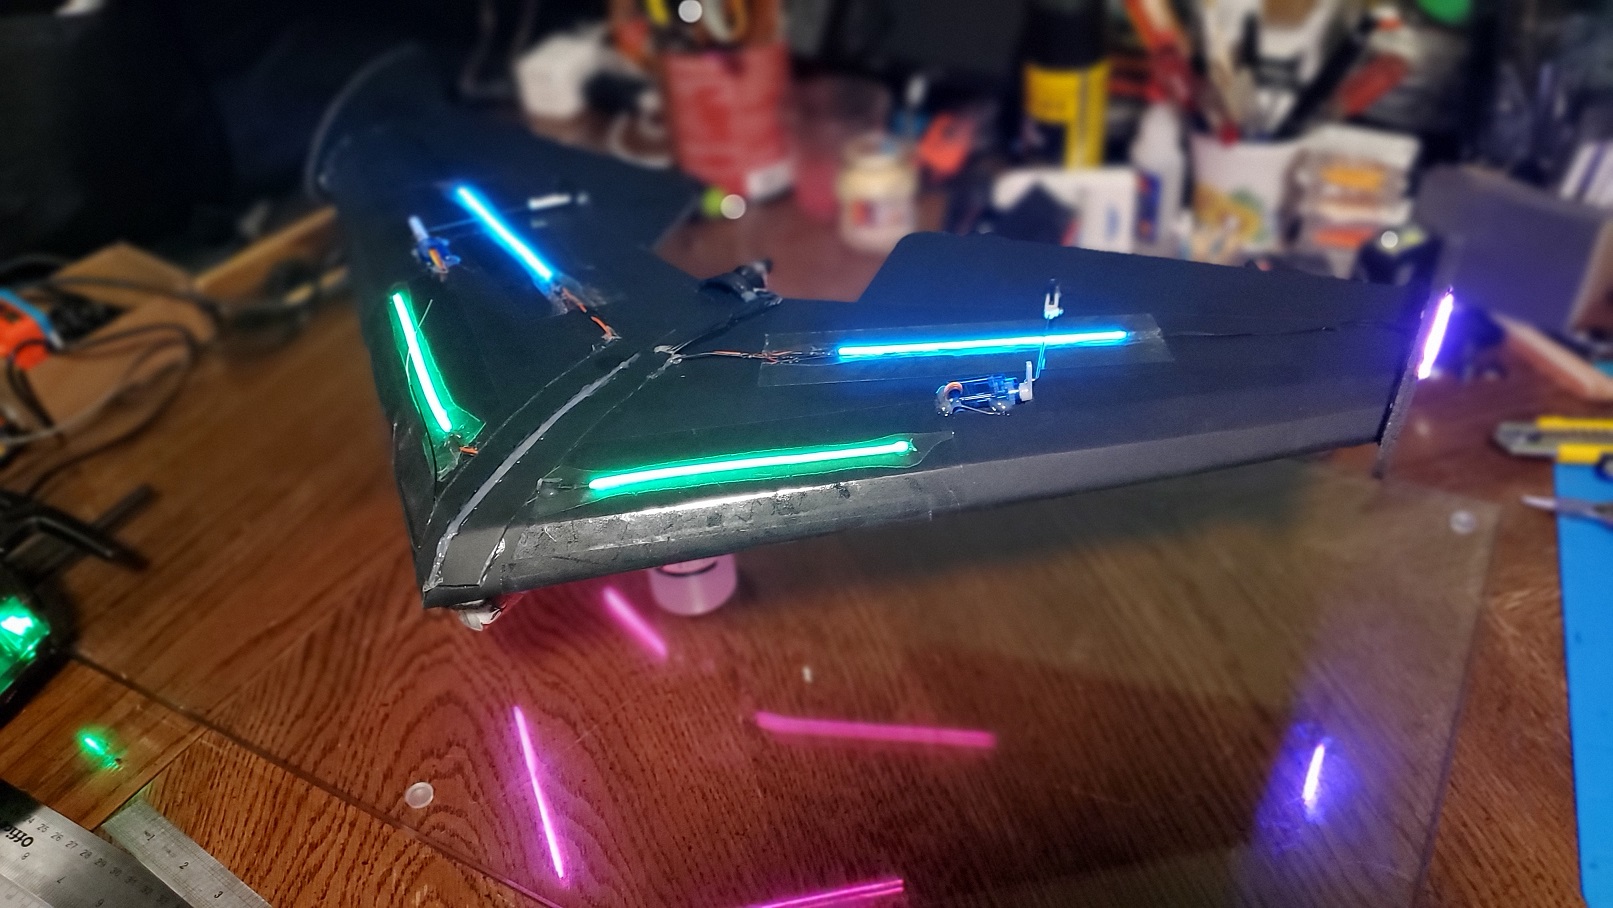
The Mini Chiroptera is one of my favorite planes to fly, being quite stable and easy to fly yet quite nimble and acrobatic, but small enough to where I can fly it just a few blocks away in a small elementary school field. After finding out about these new flexible LED filaments a few years back, I had kept that in the back of my head for the next lighted plane project. And so, this project came to fruition, using this plane and converting it to use these new LEDs.
This time around, I found it quite a bit easier to just cut out the fuselage area and then glue it back in place after everything is done and in place instead of trying to get it all in order and then gluing the second wing in place. This also makes it easer to move things around to get the CG correct, etc., as well as give easier access if you need to go in and change things later.
These filaments are quite fragile, as they are only protected with some VERY soft silicone, which is very east to break and rip apart. I actually did break a few a couple of times, but was able to successfully reconnect the extremely small traces - just know it's not the easiest thing in the world if you're not used to that kind of micro-soldering work. My advice is to make sure to use some heat shrink tubing for strengthening the connection between the power wires and the filments. I also suggest taping them down rather than gluing them, as they won't be protected, will make them harder to remove if things go wrong, and also make them more vulnerable to breaking during crashes; the filaments that I had to repair were for that very reason.
I had purchased some cheap RC electronic switches that allow you to to turn lights on and off with a button on your RC transmitter. I had tested them out in this project at first and it worked quite well, however, I wanted to push things a bit farther this time, and challenge myself to be able come up with a system to not only turn the lights on and off with the RC controller, but to be able to set their brightness as well. The LEDs are great since they are exceptionally bright, however, I wanted to be able to tone that down when it got really dark so I wasn't burning out my retinas while flying and tracking it in the sky.
I decided to use the ESP-01 since it's so small and I only needed a few GPIO pins, and I felt that an Arduino Nano would be overkill (as well as a tad heavier). They are also dirt-cheap at like a dollar a piece on AliExpress. I didn't think it would use much current, however it does a bit upon booting because it uses WiFi, but that can be turned off to save power. I should have just used an Arduino Beetle since it's also small, but also uses 5v, so I wouldn't have to do the 3.3v to 5v conversion for both power and for reading the RC PWM signal. However, I didn't have any on hand at the time. (As well, they are like five bucks vs. one dollar for the ESP-01, FYI.) The ESP-01 has four available GPIO pins (two more with some hardware hacking). GPIO0, 1, and 2 ALL need to be high/floating to boot. These highly restrictive GPIO limitations make the ESP-01 less than ideal for even simple projects.
I designed the circuit to do low-side load switching with an NPN transistor; however, this would pull whatever pin it was attached to ground. Since I'm already using GPIO3 and that's being pulled down on boot as well, I had no other GPIO pins left since GPIO0, GPIO1, and GPIO2 all have to be high/floating to be able to boot and run. I hacked the ESP-01 to use GPIO14 like I've done previously, and used that for the LED output signals. I used GPIO1 to flash the blue LED to indicate the unit has booted properly and is running code. If you're using an ESP-01S, since that doesn't exist, you'll need to take out any code lines with "BLUE_LED" or "ledstate" in them. If using a different type of Arduino, either change "BLUE_LED" to the correct GPIO for an onboard LED, or just take the code out altogether.
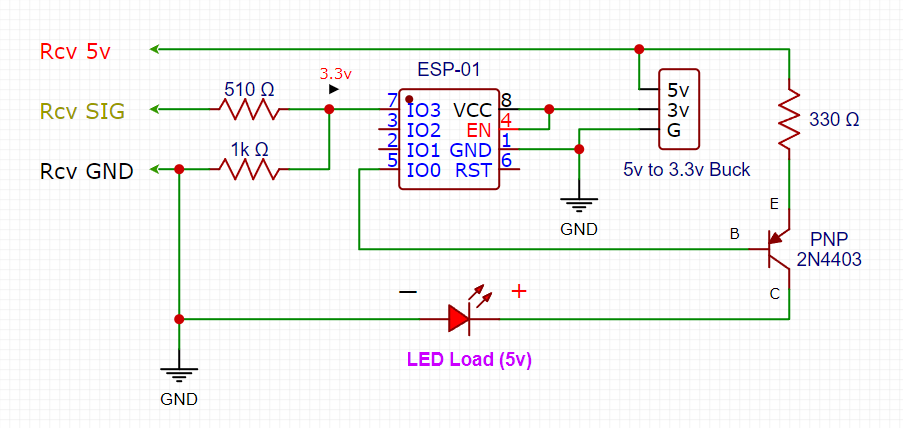
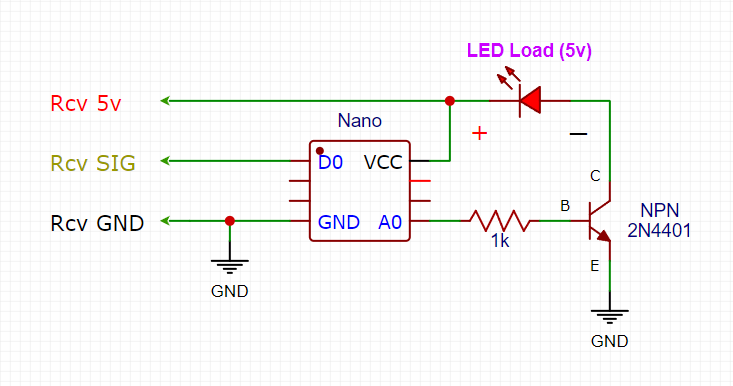
The Arduino code is quite simple. It turns off the WiFi (requires ESP8266Wifi library), uses the MedianFilter2 library to get the median of five PWM signal readings, and outputs the corresponding PWM output for the LEDs on the hacked GPIO14 pin. If using a different Arduino module, change the GPIO pins in the code as necessary. If not using a module with WiFi, take out the library include and the code that turns off the WiFi. As well, change the LED_LOAD, RCV_SIG, and BLUE_LED defines to whatever pins you want on whatever Arduino board you're using (Nano, Beetle, etc.) and modify the schematic connections to the board accordingly.
Get the Arduino code here.
 Maiden flight went well, athough medium rates were too high, so was a bit wobbly after the takeoff until I went to low rates. It is nice to be able to dial down the brightness so when it's really dark, can make it less bright so I'm not burning out my retinas from the contrast.
Parts List
- 1306 Motor - 3100 Kv
- 500 mah 3s Lipo Battery
- 700mah 3s Lipo Battery (Recommended for more nose weight)
- ESC 20 amp
- FS2A Mini Receiver
- 3050 3 inch 3 blade Propeller for 5mm shaft
- 2g Servos x2
- Flexible LED filament
- LED filament (small, not flexible)
- ESP-01 module (or any small Arduino module)